


In the world of web development, creating robust and scalable applications is essential. One popular architectural pattern that helps achieve this goal is the Model-View-Controller (MVC) architecture. MVC provides a systematic approach to building applications by separating different components and their responsibilities. In this step-by-step guide, we will walk you through the process of building an MVC application from scratch.
What is an MVC Application?
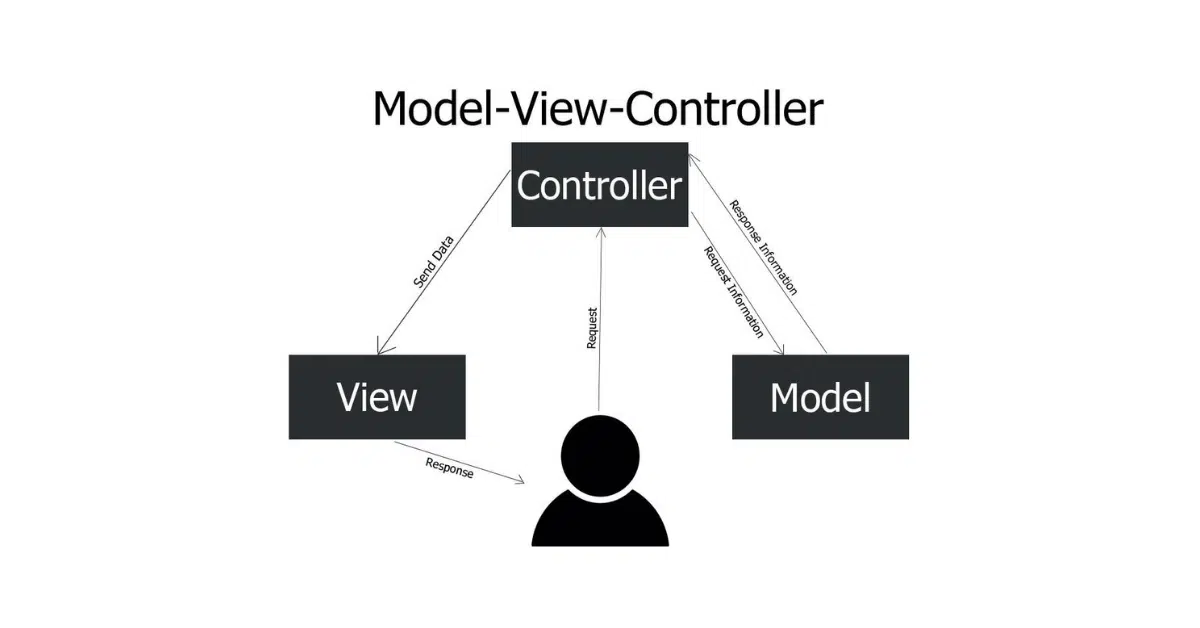
Before we delve into the technical aspects, let’s first understand what an MVC application is. Moreover, MVC stands for Model-View-Controller and is an architectural pattern used in software development. Furthermore, it divides an application into three main components:
- Model: The model component in MVC architecture represents the data and the business logic of the application. Moreover, it encapsulates the data and provides methods to manipulate and access it. The model component is responsible for maintaining the integrity of the data and enforcing business rules.
- View: The view component in MVC architecture is responsible for presenting the data to the user. It handles the user interface and displays the information retrieved from the model. Furthermore, the view is often designed using HTML, CSS, and other front-end technologies.
- Controller: The controller acts as an intermediary between the model and the view. It receives user input, interacts with the model to retrieve, or update data, and updates the view accordingly. In addition, the controller component in MVC architecture is responsible for handling user actions and managing the application flow.
Moreover, by separating the application into these three components, MVC promotes the concept of separation of concerns. Each component has a specific responsibility, making the application easier to understand, maintain, and extend.
Why use MVC architecture for application development?
MVC architecture offers several advantages that make it an excellent choice for application development. Here are some compelling reasons to consider using MVC for your next project:
- Separation of concerns
- Code reusability
- Scalability
- Improved collaboration
- Testability
- Flexibility
Setting Up the Development Environment
To begin building your MVC application, you need to set up the development environment. Furthermore, this involves choosing the programming language and framework, installing the necessary tools and dependencies, and creating a new MVC project. Let’s go through each step in detail.
1. Choosing the programming language and framework
The choice of programming language and framework depends on your project requirements, familiarity, and ecosystem support. Here are some popular options that support MVC architecture:
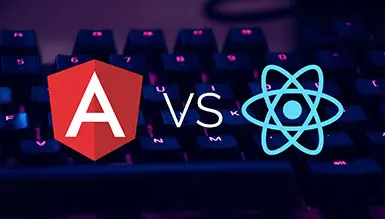
- JavaScript: You can use frameworks like React, Angular, or Vue.js.
- Python: Django and Flask are popular frameworks that support MVC.
- Ruby: Ruby on Rails is a full-stack web development framework based on MVC.
- PHP: Laravel and Symfony are widely used PHP frameworks with MVC support.
- Java: Spring MVC is a popular Java framework that implements MVC.
In addition, evaluate the strengths and weaknesses of each option, consider your team’s expertise, and choose the one that best aligns with your project requirements.
2. Installing the necessary tools and dependencies
Once you’ve chosen the programming language and framework, you need to install the necessary tools and dependencies. Moreover, most frameworks provide command-line tools that simplify the setup process. Here are the general steps:
- Install the programming language
- Install the framework
- Set up a development environment
- Install dependencies
3. Creating a new MVC project
After setting up the development environment, you can create a new MVC project. This step varies depending on the framework you’ve chosen. Here’s a general outline:
- Initialize the project: Use the command-line tool provided by the framework to create a new project. Furthermore, this command sets up the project structure and creates the necessary files.
- Configure the project: Update the project configuration files to specify settings such as database connection details, application routes, and other environment-specific configurations.
- Verify the installation: Run a test command provided by the framework to ensure that the project is set up correctly. In addition, this command checks if all dependencies are installed and if the project can be run successfully.
- Furthermore, with the development environment set up and the project created, you’re ready to start building the different components of your MVC application. Let’s begin with the Model component.
Also Read: Top 10 Frontend & Backend Web Development Frameworks
Creating the Model
The Model component forms the backbone of an MVC application. It encapsulates the data and defines the business logic. Let’s explore how to create the Model in your MVC application.
1. Defining the data structure
Start by identifying the data entities in your application. These entities represent the different types of data your application will work with. For example, in an e-commerce application, you may have entities like “Product,” “User,” and “Order.”
For each entity, define the attributes that describe it. These attributes can include properties like “name,” “price,” “quantity,” and “created at.” Choose the appropriate data types for each attribute, such as strings, numbers, or dates.
Once you have identified the entities and their attributes, you can create classes or structures in your programming language to represent them. These classes or structures will serve as the blueprint for creating instances of these entities in your application.
2. Implementing business logic
In addition to defining the data structure, the Model component also includes the business logic of your application. This logic defines how the data is processed and manipulated. Here are some key aspects to consider when implementing the business logic:
- Validation
- Data manipulation
- Business rules
Furthermore, by implementing the business logic within the Model component, you ensure that the data is handled consistently and accurately throughout the application.
Designing the Views
The View component in MVC is responsible for presenting the data to the user. It handles the user interface and incorporates design elements to enhance the user experience. Let’s explore how to design the Views in your MVC application.
1. Creating user interfaces
Designing user interfaces involves creating a visual representation of your application’s views. Here are some key steps to consider:
- Identify the views: Determine the different views your application requires to present the data to the user. This can include home pages, product listings, user profiles, or any other interface where data is displayed.
- Sketch the layout: Create rough sketches or wireframes of each view to plan the layout and the placement of different elements. Consider the placement of headers, navigation menus, content sections, and footers.
- Convert to HTML/CSS: Once you have the layout finalized, convert the sketches into actual HTML and CSS code. Use HTML tags to structure the content and CSS styles to define the visual appearance.
- Incorporate interactivity: Enhance the user experience by incorporating interactivity using JavaScript or frameworks like React or Angular. This can include dynamic content loading, form validation, or real-time updates.
Moreover, by designing user interfaces effectively, you can create visually appealing views that engage users and provide a seamless browsing experience.
2. Implementing layouts and templates
To ensure consistency across multiple views, you can implement layouts and templates. Here’s how you can incorporate layouts and templates:
- Define a layout: Create a base layout that includes common elements like headers, footers, and navigation menus. This layout remains consistent across all views, providing a unified look and feel.
- Use templates: Create reusable templates for specific sections of your views. These templates can be used to display lists of items, forms, or any other recurring elements. By using templates, you can avoid duplicating code and ensure consistency.
- Apply CSS styles: Use CSS styles to customize the appearance of your views. Define styles for typography, colors, spacing, and other visual elements. CSS frameworks like Bootstrap or Foundation can expedite the styling process.
In addition, implementing layouts and templates improves the maintainability and consistency of your application’s views. It allows for easier updates and modifications across multiple pages.
Implementing the Controller
The Controller component acts as the bridge between the Model and the View. It handles user input, processes requests, and updates the view accordingly. Let’s explore how to implement the Controller in your MVC application.
1. Handling user input
The Controller is responsible for capturing user input and initiating the appropriate actions. Here are the key steps involved in handling user input:
- Identify user actions
- Define
- Capture user input
2. Processing requests and generating responses
Once the user input is captured, the Controller processes the requests and generates the appropriate responses. Here’s how you can handle request processing:
- Retrieve data from the Model: Use the Model component to retrieve the required data based on the user input and the requested action. This can involve querying the database, calling methods on the Model, or accessing external APIs.
- Apply business logic: Implement the necessary business logic within the Controller to process the retrieved data. This can include data manipulation, calculations, or any other operations specific to the user action.
- Update the View: Once the data is processed, update the View component to reflect the changes. Pass the processed data to the View and trigger the necessary updates to render the updated content.
In addition, by processing requests and generating responses, the Controller ensures that the user’s actions are handled appropriately, and the View reflects the correct data.
3. Managing application flow
The Controller component also manages the flow of the application by determining which views to display and when. Here are some key aspects of managing application flow:
- Determine view transitions: Based on the user’s actions and the current state of the application, decide which views to display next. This can involve redirecting to a different page, loading a modal, or rendering a partial view.
- Handle errors and exceptions: Implement error handling within the Controller to handle exceptional cases. This can include displaying error messages, redirecting to error pages, or gracefully handling invalid requests.
- Implement authentication and authorization: If your application requires user authentication and authorization, incorporate the necessary checks and controls within the Controller. Ensure that only authorized users can access certain views or perform specific actions.
Furthermore, by effectively managing the application flow, the Controller component provides a seamless user experience and ensures that the application behaves as expected.
Routing and URL Mapping
Routing and URL mapping are essential aspects of MVC architecture. They define the routes that map URLs to specific controller actions. Let’s explore how to configure routes in your MVC application.
1. Configuring routes for different actions
Start by identifying the different actions or user interactions in your application. For each action, define a corresponding route that maps to a specific controller method. Here’s how you can configure routes:
- Define route patterns: Specify the patterns for different routes based on the desired URL structure. For example, you can have routes like “/products” to display a list of products or “/products/:id” to view a specific product.
- Map routes to controller actions: Associate each route pattern with the corresponding controller method that handles the action. This mapping can be defined in a routing configuration file or directly in the code.
- Handle URL parameters (optional): If your application requires dynamic parameters in the URL, such as an ID or a slug, define route patterns that capture these parameters. Access the captured values within the corresponding controller method.
Furthermore, by configuring routes for different actions, you define the navigation paths and enable users to access specific views and perform desired actions within your application.
2. Mapping URLs to controller methods
Once the routes are defined, you need to map them to specific controller methods. Here’s how you can map URLs to controller methods:
- Define controller methods: Create methods within the Controller component that correspond to the actions defined in the routes. These methods will be responsible for processing the requests and generating the appropriate responses.
- Map routes to controller methods: Establish the mapping between the defined routes and the corresponding controller methods. This can be done through annotations, configuration files, or routing mechanisms provided by your framework.
- Invoke controller methods: When a user accesses a specific URL, the corresponding route triggers the associated controller method. The method is then responsible for handling the user’s request and generating the necessary response.
Furthermore, by mapping URLs to controller methods, you establish the connection between user actions, routes, and the associated logic within the Controller component.
Data Validation and Form Handling
Data validation and form handling play a crucial role in ensuring the integrity and accuracy of user-submitted data. Let’s explore how to implement data validation and handle form submissions in your MVC application.
1. Implementing input validation
Input validation involves checking the user-submitted data to ensure that it meets the required constraints and is in the expected format. Here’s how you can implement input validation:
- Define validation rules: Determine the validation rules specific to each form or input field. For example, you may require a field to be non-empty, have a minimum length, or match a specific pattern.
- Validate user input: In the controller method responsible for handling form submissions, validate the user input against the defined validation rules. Use appropriate validation libraries or frameworks provided by your programming language or framework.
- Handle validation errors: If validation fails, generate error messages indicating the specific validation errors. These messages can be displayed to the user to help them correct their input.
Moreover, by implementing input validation, you ensure that the data submitted by users is accurate, consistent, and meets the required criteria.
2. Handling form submissions
Forms are a common element in web applications for capturing user input. Here’s how you can handle form submissions in your MVC application:
- Render the form: Design and render the form view that includes the necessary input fields and submission button. Define the form action URL to point to the corresponding controller method that handles the form submission.
- Capture form data: In the controller method responsible for handling form submissions, retrieve the form data submitted by the user. This can be done by accessing the form fields’ values through the request object provided by your framework.
- Validate and process form data: Validate the user-submitted data using the input validation techniques discussed earlier. If the validation passes, process the data according to the application’s business logic.
- Display validation errors (if any): If the validation fails, generate appropriate error messages, and redisplay the form with the user’s input. The error messages can inform the user about the specific validation errors.
Furthermore, by handling form submissions effectively, you ensure that user input is captured accurately and processed according to the application’s requirements.
Testing and Debugging
Testing and debugging are crucial phases in application development to ensure the correctness and reliability of your MVC application. Let’s explore how to test and debug your application effectively.
1. Writing unit tests for controllers and models
Unit tests help verify the functionality of individual components, such as controllers and models, in isolation. Here’s how you can write unit tests for controllers and models:
- Identify test scenarios: Determine the different scenarios that need to be tested for each component. This can include positive cases, negative cases, edge cases, and boundary conditions.
- Write test cases: Create test cases that cover the identified scenarios. Each test case should specify the input data, the expected output, and any specific assertions or validations to perform.
- Execute test cases: Run the unit tests using a testing framework or tool that integrates with your programming language or framework. Analyze the test results to ensure that the components function as expected.
Moreover, by writing unit tests, you can identify and fix issues early in the development process, ensuring the reliability of your MVC application.
2. Debugging common issues and errors
During development, it’s common to encounter issues or errors that affect the functionality of your application. Effective debugging techniques can help identify and resolve these problems. Here are some tips for debugging:
- Review error messages and logs
- Use breakpoints
- Step through the code
- Log and monitor application behavior
By utilizing effective debugging techniques, you can identify and resolve issues quickly, ensuring the smooth operation of your MVC application.
Deploying the MVC Application
Deploying your MVC application involves making it available for users to access on a production server. Let’s explore the steps to deploy your MVC application effectively.
1. Preparing the application for deployment
Before deploying your MVC application, ensure that it’s ready for production use. Here are some important considerations:
Optimize performance: Optimize your application’s performance by minimizing resource usage, optimizing database queries, and implementing caching mechanisms where applicable.
Secure the application: Implement security measures such as user authentication, authorization checks, data encryption, and protection against common web vulnerabilities like SQL injection and cross-site scripting (XSS).
Configure production environment: Set up the necessary configuration for your application to run in a production environment. This includes database configuration, server settings, and any other environment-specific configurations.
Moreover, by preparing your application for deployment, you ensure that it meets the necessary requirements for production use.
2. Choosing a Hosting Environment
Selecting a suitable hosting environment is crucial for deploying your MVC application.
Consider the following factors when choosing a hosting environment:
- Scalability: Assess the scalability options provided by the hosting environment to accommodate future growth and increased user traffic.
- Performance: Evaluate the hosting environment’s infrastructure and resources to ensure that it can handle the expected workload and deliver optimal performance.
- Reliability: Choose a hosting provider known for its reliability and uptime guarantees to minimize the risk of downtime and ensure consistent access to your application.
- Security: Ensure that the hosting environment provides robust security measures, including firewalls, intrusion detection systems, and secure data transmission protocols.
- Support: Consider the level of technical support and assistance provided by the hosting provider, especially in case of any issues or emergencies.
Furthermore, by carefully selecting a hosting environment, you can ensure that your MVC application is deployed in a reliable and secure manner.
3. Deploying the application to a server
Once you have prepared your application and chosen a hosting environment, it’s time to deploy your MVC application to a server. Here’s a general outline of the deployment process:
- Set up the server: Provision a server instance that meets the requirements of your MVC application. This may involve selecting an operating system, installing necessary software dependencies, and configuring the server environment.
- Transfer application files: Copy your MVC application’s files to the server using secure file transfer methods like Secure File Transfer Protocol (SFTP) or through version control systems like Git.
- Install dependencies: Install any required dependencies, libraries, or frameworks on the server to ensure that your application can run without issues.
- Configure the server: Configure the server settings, such as web server configurations, database connections, and environment variables, to match the requirements of your MVC application.
- Test the deployment: Perform thorough testing of your deployed application to ensure that it functions correctly in the production environment. Test various features, functionalities, and scenarios to validate the deployment.
- Monitor and maintain: Set up monitoring tools and processes to keep track of the application’s performance, detect any issues, and perform regular maintenance tasks like security updates and backups.
In addition, by following a systematic deployment process, you can make your MVC application available for users to access and ensure its smooth operation in a production environment.
Conclusion
The future of MVC architecture in web development looks promising, with continued adoption and advancements in frameworks and tools. Moreover, by staying updated with the latest trends and technologies, you can further enhance your MVC application development skills.
Furthermore, if you are looking for professional MVC application development services or need assistance with custom web application development, consider reaching out to an experienced on-demand app development company that specializes in MVC architecture and application design. Moreover, They can provide expert guidance, IT consulting, and project management to ensure the success of your MVC application.
Ready to start building your MVC application?
Let’s dive into the world of MVC together and create amazing web applications!
Frequently Asked Questions
Q: What are the steps in building MVC architecture?
A: Building an MVC application involves following a series of steps to ensure a successful outcome. It begins with understanding the MVC architecture and designing the database schema. Then, models, views, and controllers are created to handle data, display the user interface, and facilitate communication between the two. Hence, by following this step-by-step guide, developers can build efficient and robust MVC applications.
Q: What are the alternatives to MVC architecture?
A: While MVC is a widely used architecture, there are alternative architectures available for web application development. Some popular alternatives include:
- MVVM (Model-View-ViewModel)
- MVP (Model-View-Presenter)
- FLUX
Q: Which programming languages/frameworks support MVC?
A: MVC architecture is not tied to any specific programming language or framework. It is a design pattern that can be implemented in various programming languages and frameworks. Some popular programming languages and frameworks that support MVC include:
- Java: Spring MVC, JavaServer Faces (JSF), Play Framework
- C#: ASP.NET MVC, ASP.NET Core MVC
- Python: Django, Flask
- Ruby: Ruby on Rails
- PHP: Laravel, Symfony
- JavaScript: Express.js, Angular, React (with Flux or Redux architecture)
Q: Can an existing application be converted to MVC?
A: Converting an existing application to MVC architecture can be a significant undertaking, depending on the complexity and structure of the application. Moreover, it may require refactoring the codebase, separating concerns, and redesigning the application’s components.
Moreover, before attempting to convert an existing application to MVC, carefully assess the feasibility, potential impact on the application’s functionality, and the resources required for the conversion.
Q: How can I secure an MVC application?
A: Security is a critical aspect of web application development, including MVC applications. Here are some best practices to secure an MVC application:
- Implement user authentication and authorization
- Protect against common web vulnerabilities
- Use HTTPS for secure communication
- Implement proper session management
- Keep software dependencies updated
- Perform security testing
Q: How do you create the Model Component in an MVC Application?
A: The Model component in an MVC application represents the data and business logic of the application. Here’s a step-by-step guide to creating the Model component:
- Define the data structure
- Implement business logic
- Connect to a database
- Implement data access methods
- Expose the model interface
Related Blogs: